디버깅
목표: 일반적인 tf2 관련 문제를 디버깅하는 체계적인 방법을 사용하는 방법을 배우세요.
배경 정보
이 튜토리얼은 전형적인 tf2 문제를 디버깅하는 단계를 안내합니다.
또한 tf2_echo, tf2_monitor, view_frames 와 같은 다양한 tf2 디버깅 도구를 사용합니다.
이 튜토리얼은 tf2 학습 튜토리얼을 완료한 것으로 가정합니다.
디버깅 예제
1 예제 설정 및 시작
이 튜토리얼에서는 여러 문제가 있는 데모 애플리케이션을 설정합니다. 이 튜토리얼의 목표는 이러한 문제를 찾고 해결하기 위해 체계적인 접근 방식을 적용하는 것입니다. 먼저 소스 파일을 만들어 보겠습니다.
tf2 튜토리얼 에서 생성한 learning_tf2_cpp 패키지로 이동합니다.
src 디렉토리에서 소스 파일 turtle_tf2_listener.cpp 의 사본을 만들고 turtle_tf2_listener_debug.cpp 로 이름을 바꿉니다.
선호하는 텍스트 편집기를 사용하여 파일을 열고, 67번째 줄을 다음과 같이 변경합니다.
std::string toFrameRel = "turtle2";
에서
std::string toFrameRel = "turtle3";
그리고 75-79번째 줄의 lookupTransform() 호출을 다음과 같이 변경합니다.
try {
   transformStamped = tf_buffer_->lookupTransform(
     toFrameRel,
     fromFrameRel,
     tf2::TimePointZero);
} catch (tf2::TransformException & ex) {
에서
try {
   transformStamped = tf_buffer_->lookupTransform(
     toFrameRel,
     fromFrameRel,
     this->now());
} catch (tf2::TransformException & ex) {
그리고 파일을 저장합니다.
이 데모를 실행하려면 learning_tf2_cpp 패키지의 launch 하위 디렉토리에 start_tf2_debug_demo.launch.py 라는 런치 파일을 만들어야 합니다.
from launch import LaunchDescription
from launch.actions import DeclareLaunchArgument
from launch.substitutions import LaunchConfiguration

from launch_ros.actions import Node

def generate_launch_description():
   return LaunchDescription([
      DeclareLaunchArgument(
         'target_frame', default_value='turtle1',
         description='Target frame name.'
      ),
      Node(
         package='turtlesim',
         executable='turtlesim_node',
         name='sim',
         output='screen'
      ),
      Node(
         package='learning_tf2_cpp',
         executable='turtle_tf2_broadcaster',
         name='broadcaster1',
         parameters=[
               {'turtlename': 'turtle1'}
         ]
      ),
      Node(
         package='learning_tf2_cpp',
         executable='turtle_tf2_broadcaster',
         name='broadcaster2',
         parameters=[
               {'turtlename': 'turtle2'}
         ]
      ),
      Node(
         package='learning_tf2_cpp',
         executable='turtle_tf2_listener_debug',
         name='listener_debug',
         parameters=[
               {'target_frame': LaunchConfiguration('target_frame')}
         ]
      ),
   ])
또한 turtle_tf2_listener_debug 실행 파일을 CMakeLists.txt 에 추가하고 패키지를 빌드해야 합니다.
이제 실행하여 결과를 확인해 보겠습니다.
ros2 launch learning_tf2_cpp start_tf2_debug_demo.launch.py
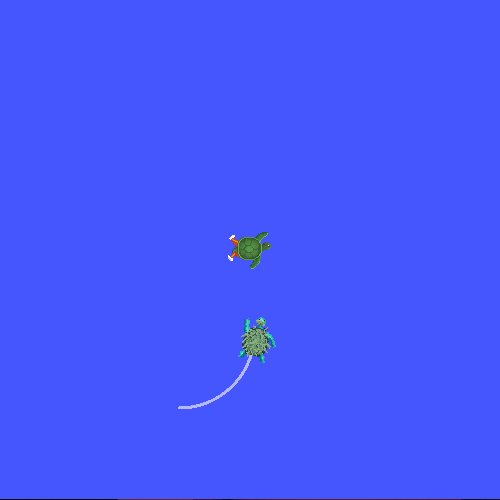
이제 turtlesim이 실행됩니다.
동시에 다른 터미널 창에서 turtle_teleop_key 를 실행하면 화살표 키를 사용하여 turtle1 을 제어할 수 있습니다.
ros2 run turtlesim turtle_teleop_key
또한 왼쪽 하단에 두 번째 거북이가 있는 것을 알 수 있습니다. 데모가 올바르게 작동하면 두 번째 거북이는 화살표 키로 제어할 수 있는 거북이를 따라야 합니다. 그러나 현재 그렇지 않습니다. 몇 가지 문제를 해결해야 합니다. 다음과 같은 메시지를 확인해야 합니다.
[turtle_tf2_listener_debug-4] [INFO] [1630223454.942322623] [listener_debug]: Could not
transform turtle3 to turtle1: "turtle3" passed to lookupTransform argument target_frame
does not exist
2 tf2 요청 찾기
우선 정확히 어떤 것을 tf2에게 요청하는지 알아야 합니다.
따라서 tf2를 사용하는 코드 부분으로 이동합니다.
src/turtle_tf2_listener_debug.cpp 파일을 열고 67번째 줄을 확인합니다.
std::string to_frame_rel = "turtle3";
그리고 75-79번째 줄을 확인합니다.
try {
   transformStamped = tf_buffer_->lookupTransform(
     toFrameRel,
     fromFrameRel,
     this->now());
} catch (tf2::TransformException & ex) {
여기서 tf2에게 실제 요청을 보내는 것입니다.
세 가지 인수는 우리가 tf2에게 무엇을 요청하고 있는지 직접 알려줍니다. 프레임 turtle3 에서 프레임 turtle1 로 시간 now 의 변환을 요청하고 있습니다.
이제 이 요청이 실패하는 이유를 살펴보겠습니다.
3 프레임 확인
먼저 tf2가 turtle3 와 turtle1 간의 변환을 인식하는지 확인하려면 tf2_echo 도구를 사용합니다.
ros2 run tf2_ros tf2_echo turtle3 turtle1
결과에서 frame turtle3 이 존재하지 않음을 알 수 있습니다.
[INFO] [1630223557.477636052] [tf2_echo]: Waiting for transform turtle3 ->  turtle1:
Invalid frame ID "turtle3" passed to canTransform argument target_frame - frame does
not exist
그럼 어떤 프레임이 존재할까요?
이를 시각적으로 확인하려면 view_frames 도구를 사용합니다.
ros2 run tf2_tools view_frames
생성된 frames.pdf 파일을 열어 다음 출력을 확인합니다.
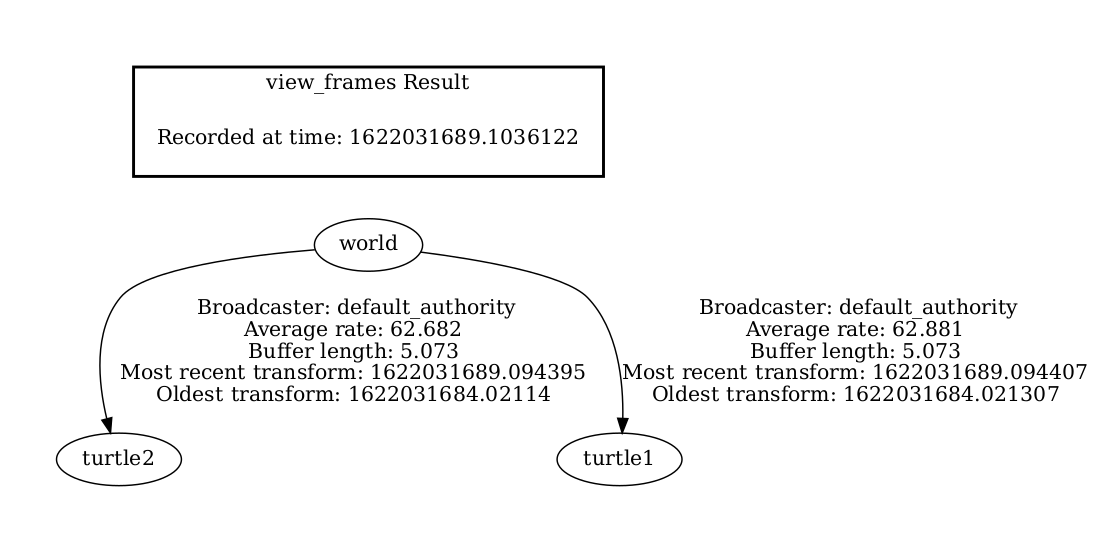
따라서 문제가 바로 turtle3 프레임을 요청하고 있기 때문임을 알 수 있습니다.
이 버그를 수정하려면 67번째 줄에서 turtle3 을 turtle2 로 바꾸면 됩니다.
이제 실행을 중지하고 데모를 빌드한 다음 다시 실행합니다.
ros2 launch turtle_tf2 start_debug_demo.launch.py
그런 다음 다음 문제에 직면합니다.
[turtle_tf2_listener_debug-4] [INFO] [1630223704.617382464] [listener_debug]: Could not
transform turtle2 to turtle1: Lookup would require extrapolation into the future. Requested
time 1630223704.617054 but the latest data is at time 1630223704.616726, when looking up
transform from frame [turtle1] to frame [turtle2]
4 타임스탬프 확인
이제 프레임 이름 문제를 해결했으므로 타임스탬프를 살펴봅니다.
기억하세요. 우리는 현재 시간(즉, now)에 대한 turtle2 와 turtle1 간의 변환을 얻으려고 시도하고 있습니다.
타이밍에 대한 통계를 얻으려면 해당 프레임으로 tf2_monitor 를 호출하십시오.
ros2 run tf2_ros tf2_monitor turtle2 turtle1
결과는 다음과 같아야 합니다.
RESULTS: for turtle2 to turtle1
Chain is: turtle1
Net delay     avg = 0.00287347: max = 0.0167241

Frames:
Frame: turtle1, published by <no authority available>, Average Delay: 0.000295833, Max Delay: 0.000755072

All Broadcasters:
Node: <no authority available> 125.246 Hz, Average Delay: 0.000290237 Max Delay: 0.000786781
여기서 중요한 부분은 turtle2 에서 turtle1 로의 체인의 지연입니다.
결과에서 평균적으로 약 3 밀리초의 지연이 있는 것으로 나타납니다.
이것은 tf2가 3 밀리초 후에만 변환을 수행할 수 있음을 의미합니다.
따라서 now 대신에 변환을 하는 3 밀리초 전의 타임스탬프를 사용하면 가끔 답을 얻을 수 있습니다.
이를 빠르게 테스트하려면 75-79번째 줄을 다음과 같이 변경하십시오.
try {
   transformStamped = tf_buffer_->lookupTransform(
     toFrameRel,
     fromFrameRel,
     this->now() - rclcpp::Duration::from_seconds(0.1));
} catch (tf2::TransformException & ex) {
새 코드에서는 거북이 사이의 변환을 100 밀리초 전으로 요청하고 있습니다. 일반적으로 변환이 도착할 것이 확실하도록 더 긴 기간을 사용하는 것이 좋습니다. 데모를 중지하고 빌드한 다음 실행합니다.
ros2 launch turtle_tf2 start_debug_demo.launch.py
이제 거북이가 움직이는 것을 볼 수 있습니다!
마지막으로 우리가 한 마지막 수정은 실제로 원하는 것이 아니므로 참고용으로만 사용해야 합니다. 문제가 무엇인지 확인하기 위한 것이었습니다. 실제 수정은 다음과 같아야 합니다.
try {
   transformStamped = tf_buffer_->lookupTransform(
     toFrameRel,
     fromFrameRel,
     tf2::TimePointZero);
} catch (tf2::TransformException & ex) {
또는 다음과 같이 사용할 수 있습니다.
try {
   transformStamped = tf_buffer_->lookupTransform(
     toFrameRel,
     fromFrameRel,
     tf2::TimePoint());
} catch (tf2::TransformException & ex) {
타임아웃에 대한 자세한 내용은 시간 사용 튜토리얼에서 확인하고 다음과 같이 사용할 수 있습니다.
try {
   transformStamped = tf_buffer_->lookupTransform(
     toFrameRel,
     fromFrameRel,
     this->now(),
     rclcpp::Duration::from_seconds(0.05));
} catch (tf2::TransformException & ex) {
요약
이 튜토리얼에서는 tf2 관련 문제를 디버깅하기 위한 체계적인 접근 방법을 사용하는 방법을 배웠습니다.
또한 tf2 디버깅 도구인 tf2_echo, tf2_monitor, view_frames 등을 사용하여 tf2 문제를 디버깅하는 데 도움이 되는 방법을 배웠습니다.